Getting Started
This chapter covers how to setup and run RDK programs for the first time.
Caution
Before proceeding, make sure the robot is powered OFF, securely mounted onto a steady base, and won’t topple over when moving at high speed with sudden stops.
Activate RDK server
The RDK server module on the robot is deactivated by default, and needs to be enabled via steps below before the RDK client can connect to the robot:
Normally boot up the robot and the Flexiv Elements UI tablet. The LED rings on the robot will turn solid blue when the robot is successfully booted. This process will take about 1 minute.
Note
Blinking LED rings indicate that a fault occurred. Please refer to Troubleshooting for more details.
Wait for the UI tablet to be connected to the robot. If this step takes too long, try re-start the UI program.
Use the UI tablet to enable the robot and check that the robot is running normally.
In the UI tablet, navigate to Settings -> Remote Mode.
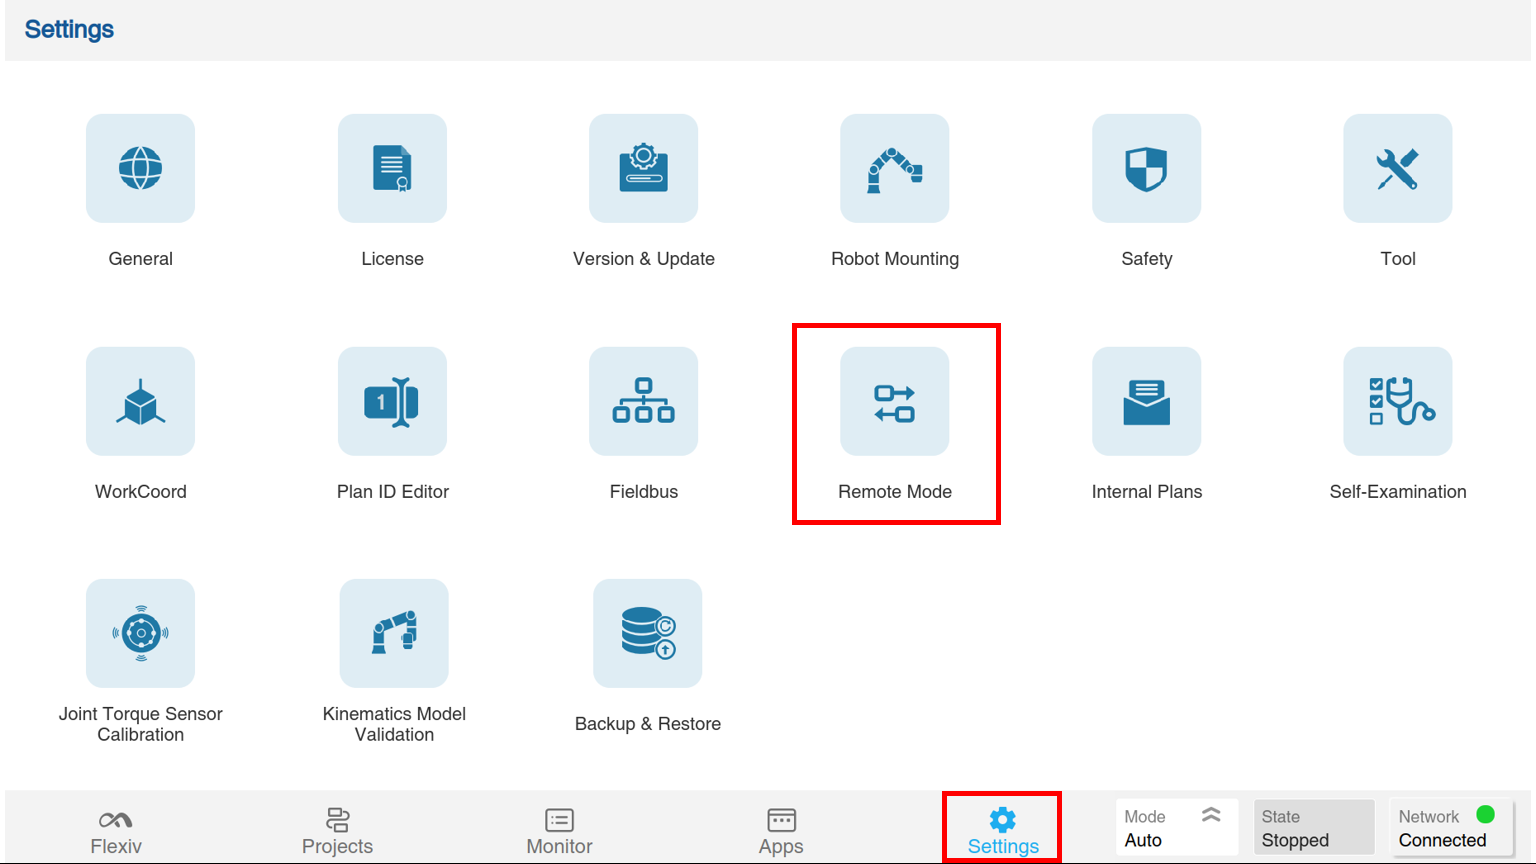
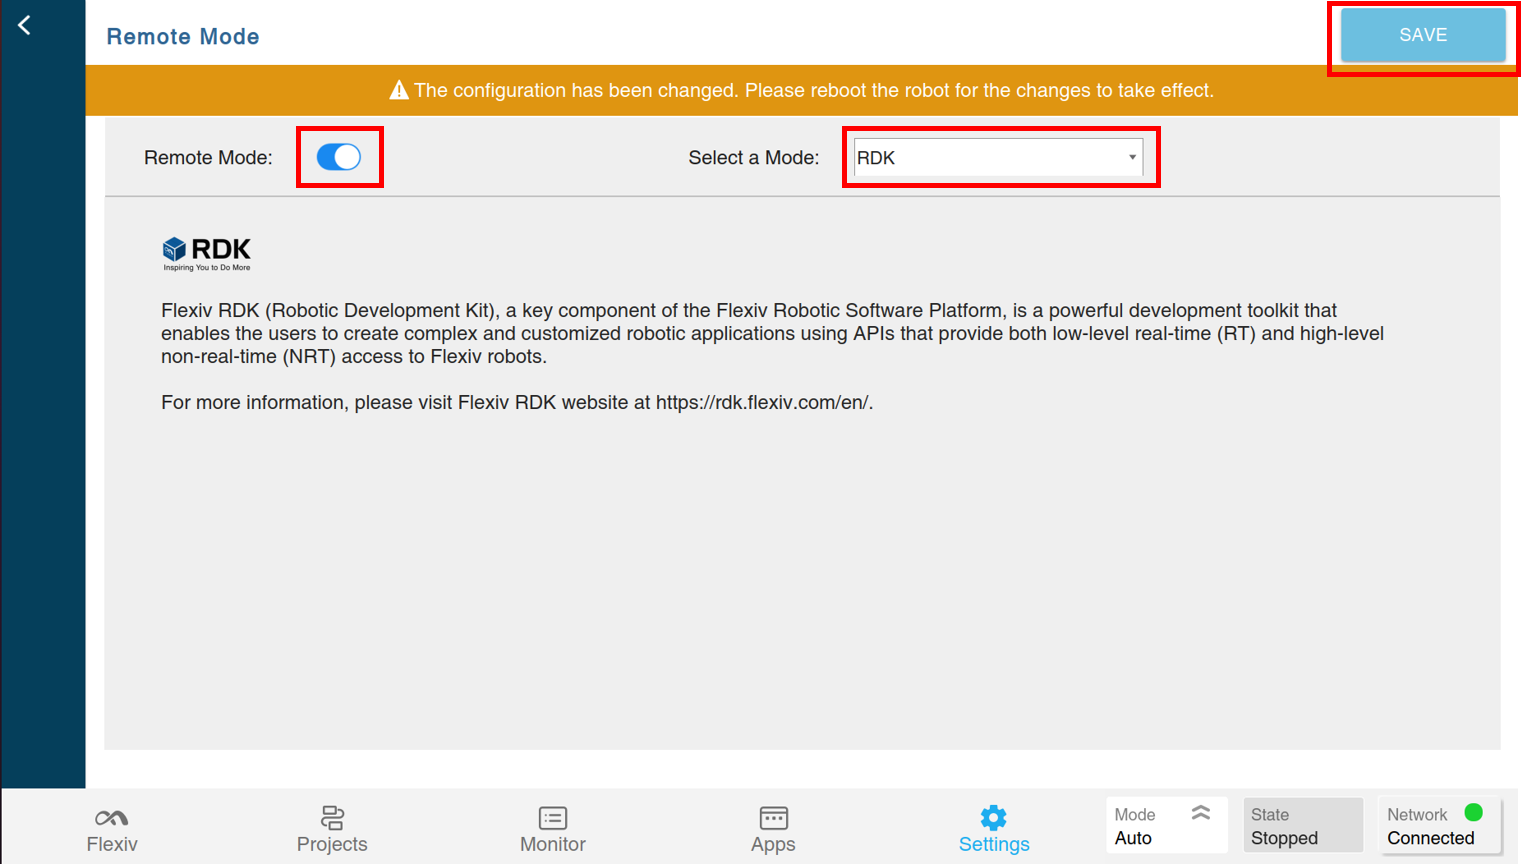
Enable Remote Mode and select “RDK”, then save the configuration.
If any tool is to be mounted, the tool information must be configured. In the UI tablet, navigate to Settings -> Tool, and click “TOOL LIST” on the left side, then configure a new tool or apply an existing tool and save.
Power OFF the robot, but do not reboot it yet until instructed.
Establish connection
After the RDK server module on the robot is activated, a connection between the workstation PC and the robot can be established via steps below:
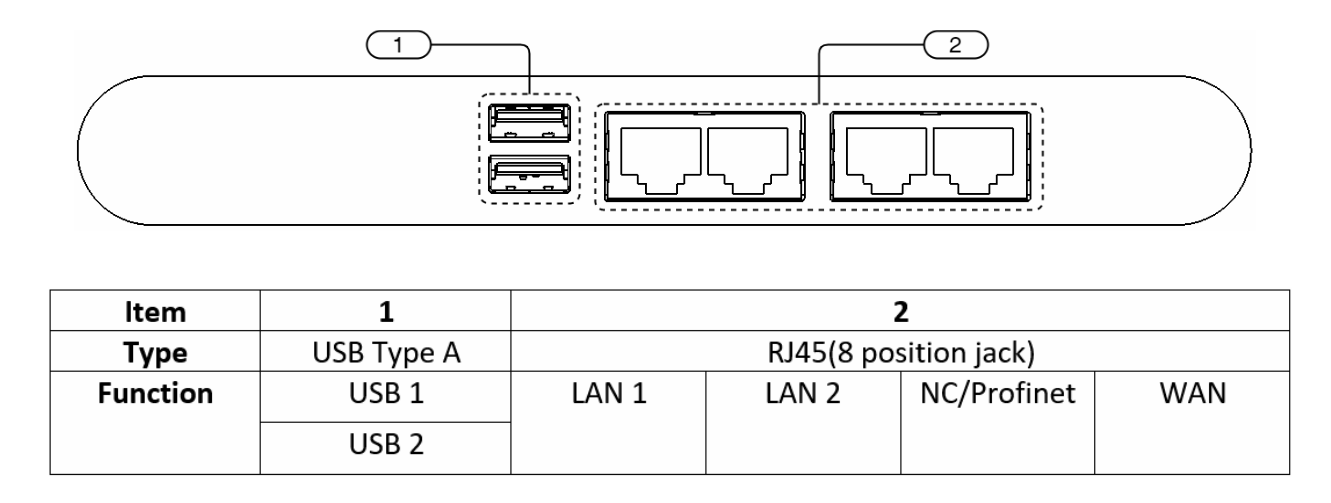
Use an Ethernet cable to connect the Ethernet port on the workstation PC to any of the LAN ports on the robot’s control box.
Important
For real-time access to the robot, a direct wired connection between the workstation PC and the robot is highly recommended. Going through additional network devices or wireless connection can result in reduced control performance due to increased latency. However, this restriction does not apply to non-real-time access.
With the system powered OFF, push the Auto/Manual slide switch on the motion bar to upper position (Auto mode).
Note
RDK can only run in Auto mode. Difference between Auto and Manual mode:
Auto mode: the robot can run automated programs without interacting with humans. The safety limits are set to allowed maximum, including force, torque, speed, etc.
Manual mode: the robot can interact with humans but cannot run automated programs. The safety limits are restricted and the robot will create additional resistance to act gently.
Please refer to the robot manual for more details.
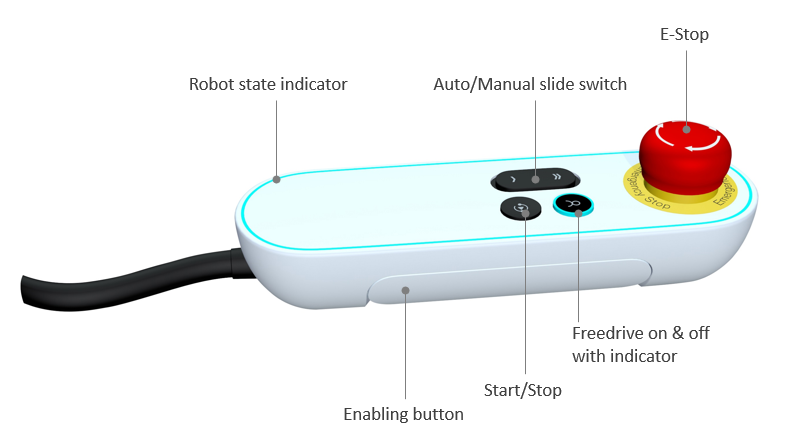
Check that the E-Stop (emergency stop) on the motion bar is pressed DOWN.
Power ON the robot, then wait until the robot is fully booted.
Now the connection between the workstation PC and the robot should have already been established, check the connection by pinging the robot from the workstation PC:
ping <robot_ip>
By default,
robot_ipis192.168.2.100. The time value from the ping command denotes the round trip latency. Make sure this latency complies with the requirement listed in System Setup.Note
The workstation PC must be in the same subnet (i.e. with IP address
192.168.2.x) with the robot in order to connect. However, the user does NOT need to configure the workstation PC’s IP address manually, because the robot has its own DHCP server built in. So when the robot finishes booting with the workstation PC is connected, the DHCP server will automatically assign an IP address in the same subnet to the workstation PC.Use
ifconfigcommand (Linux, macOS) oripconfigcommand (Windows) to check the IP address that the DHCP server assigned to the workstation PC, and note it down. This is referred to aslocal_ipin following sections.
Download RDK library
RDK library can be downloaded to the workstation PC from any of the following sources:
GitHub repository [flexiv_rdk].
flexiv.com [download page].
Important
Before downloading, please refer to the release note to confirm the RDK version that’s compatible with the software currently installed in the robot. RDK will report an error during initialization if the robot has an incompatible software version.
Setup and run C++ RDK
Note
If you will only be using Python RDK, you can skip this section and jump to Setup and run Python RDK.
The C++ RDK is packed into a unified modern CMake library named flexiv_rdk, which can be configured via CMake on all supported OS.
Compile and install for Linux
Note
For Ubuntu 18.04, the C++ headers are too old to compile RDK, thus need to be updated via:
sudo add-apt-repository ppa:ubuntu-toolchain-r/test
sudo apt update
sudo apt install libstdc++6
The installed version of libstdc++6 should be greater than 10.0.
In a new Terminal, install C++ compiler, Git, and CMake (with GUI) using the package manager:
sudo apt install build-essential git cmake cmake-qt-gui -y
Choose a directory for installing
flexiv_rdklibrary and all its dependencies. For example, a new folder namedrdk_installunder the home directory.In a new Terminal, use CMake to configure
flexiv_rdk:cd flexiv_rdk mkdir build && cd build cmake .. -DCMAKE_INSTALL_PREFIX=~/rdk_install
Note
-Dfollowed byCMAKE_INSTALL_PREFIXis a CMake parameter specifying the path of the chosen installation directory. Alternatively, this configuration step can also be done through CMake GUI.
Compile and install
flexiv_rdklibrary:cd flexiv_rdk/build cmake --build . --target install --config Release
Note
The installation of
flexiv_rdklibrary is complete now. The following steps show how to link to the installed library from a user project.
To find and link to the installed
flexiv_rdklibrary from a user project, using the provided example project for instance:cd flexiv_rdk/example mkdir build && cd build cmake .. -DCMAKE_INSTALL_PREFIX=~/rdk_install cmake --build . --config Release -j 4
Note
-Dfollowed byCMAKE_INSTALL_PREFIXtells user project’s CMake where to find the installedflexiv_rdklibrary.
Compile and install for macOS
In a Terminal, use
xcode-selectcommand to invoke the installation of Xcode Command Line Tools, then follow the prompted window to finish the installation.Download
cmake-3.x.x-macos-universal.dmgfrom CMake download page and install the dmg file. The minimum required version is 3.16.3.When done, start CMake from Launchpad and navigate to Tools -> How to Install For Command Line Use. Then follow the instruction “Or, to install symlinks to ‘/usr/local/bin’, run:” to install
cmakeandcmake-guicommand for use in Terminal.The rest steps are the same as Compile and install for Linux, beginning from step 2.
Compile and install for Windows
Install Microsoft Visual Studio with version 2015 or above (MSVC 14.0+). Choose the “Desktop development with C++” package during installation.
Download
cmake-3.x.x-windows-x86_64.msifrom CMake download page and install the msi file. The minimum required version is 3.16.3. Add CMake to system PATH when prompted, so thatcmakeandcmake-guicommand can be used from Command Prompt or a bash emulator.Install a bash emulator. Git Bash that comes with Git (for Windows) installation is recommended.
Within the bash emulator, the rest steps are the same as Compile and install for Linux, beginning from step 2.
Run example C++ program
Make sure the robot has already finished booting and the connection between the workstation PC and the robot server is successfully established according to the aforementioned instructions.
Release (pull up) the emergency stop (E-stop) button on the motion bar. The robot will have no action because an enabling method must be called to actually enable the robot.
Run the most basic example program
basics1_display_robot_statesto check the RDK connection can be established and the robot is normally operational. This example program will first enable the robot, then hold the robot while printing out all received robot states. For Linux and macOS:cd flexiv_rdk/example/build ./basics1_display_robot_states [robot_ip] [local_ip]
Note
sudois not required unless prompted by the program saying “root privilege is required”.For Windows:
cd flexiv_rdk\example\build\Release
basics1_display_robot_states.exe [robot_ip] [local_ip]
The robot will be enabled and release the joint brakes, which will make some audible crispy sound. After a few seconds, when the enabling process is done and the robot becomes operational, robot states data will be obtained from the server and gets printed in the Terminal. An excerpt of the output is as follows:
{
"q": [-0.02276,-0.0937682,0.0155674,1.62589,-0.0225268,0.208001,0.305311],
"theta": [-0.0230455,-0.0920024,0.0158942,1.62436,-0.022891,0.208576,0.307476],
"dq": [0.148054,0.0437919,0.122067,0.0455735,0.000637466,-0.00113799,0.241857],
"dtheta": [0.139027,0.0438319,0.121441,0.0512989,-0.000282414,-0.00172493,0.253589],
"tau": [0.616091,31.0906,0.935915,-23.633,-2.58817,2.43764,0.359142],
"tau_des": [1.56515,1.33795,0.700978,1.1427,0.2864,-0.113417,0.56946],
"tau_dot": [-44.9559,-8.10623,8.79854,1.38283,3.13401,14.9822,7.0242],
"tau_ext": [-0.180099,-0.775732,-0.0763522,-0.69938,-0.44841,0.166297,-0.441835],
"tcp_pose": [0.55174,-0.114317,0.593904,0.0226307,0.150829,0.988264,-0.00854974],
"tcp_pose_d": [0.548872,-0.104836,0.593404,0.0257007,0.152765,0.987845,-0.01286],
"tcp_velocity": [0.00320276,0.141547,-0.00176686,0.0203958,0.00281812,0.00697462],
"camera_pose": [0.623739,-0.136403,0.635011,0.00995671,-0.592156,0.805461,-0.0220479],
"flange_pose": [0.55174,-0.114317,0.593904,0.0226307,0.150829,0.988264,-0.00854974],
"end_link_pose": [0.548621,-0.112561,0.667818,0.00854974,0.988264,-0.150829,0.0226307],
"F_ext_tcp_frame": [-0.921438,-0.445242,-0.515255,0.139577,0.0974587,-0.323618],
"F_ext_base_frame": [0.723944,-0.687035,0.562729,-0.117632,0.142245,0.315654],
}
To close the running example program, simply press
Ctrl+C.
Setup and run Python RDK
The Python RDK provides a fast and compilation-free way to deploy RDK programs.
Install supported version of Python
Python 3.8 and 3.10 can be used to run Python RDK on all supported OS (Linux, macOS, and Windows). To check the version of currently installed Python:
python3 --version
If the version does not match neither of the supported Python version, you can install the supported version of Python using instructions below.
Linux
On Linux, to install a specific version of Python alongside the existing Python, the easiest way is to use a PPA:
sudo apt install software-properties-common
sudo add-apt-repository ppa:deadsnakes/ppa
Press Enter to confirm adding the PPA, then install the desired Python version:
sudo apt update
sudo apt install python3.x
When done, this specific version of Python can be directly invoked from Terminal using python3.x:
python3.x --version
Some RDK Python examples require packages installed from the pip Python package manager. To install pip
for the PPA-installed Python 3.x:
sudo apt install python3.x-distutils
wget https://bootstrap.pypa.io/get-pip.py
python3.x get-pip.py
Once it’s finished, you can install a Python package discoverable by the PPA-installed Python 3.x via:
python3.x -m pip install <package_name>
Warning
The ordinary sudo apt install python3-pip method will only install pip for the system’s native Python 3,
and Python packages installed from this pip is not discoverable by the PPA-installed Python 3.x.
macOS
On macOS, to install a specific version of Python alongside the existing Python, the easiest way is to use Homebrew:
brew install python@3.x
The executable will be installed to /opt/homebrew/bin/python3.x and can be directly invoked from Terminal using python3.x.
You can install a Python package discoverable by this specific version of Python via:
python3.x -m pip install <package_name>
Windows
On Windows, to install a specific version of Python alongside the existing Python, the easiest way is to search and install it from Microsoft Store.
The installed Python can be directly invoked from Command Prompt using python3.x.
You can install a Python package discoverable by this specific version of Python via:
python3.x -m pip install <package_name>
Run example Python program
Similar to Run example C++ program, but without the need for any compilation, the execution command for example Python program is:
cd flexiv_rdk/example_py
python3 basics1_display_robot_states.py [robot_ip] [local_ip]
Note
Replace command python3 with python3.x to explicitly invoke a specific version of Python.
Client-server reconnection
When the RDK user program is terminated or the connection is lost, the robot will automatically decelerate to a halt and hold its position. The robot server supports on-the-fly reconnection, so you can terminate a user program and start a new one without doing anything to the robot server.
The next chapter will provide more details on the RDK library, and you can also check out the other examples to get familiar with it.
Free-drive (floating) when using RDK
There are mainly 2 ways to free-drive the robot when using RDK:
Invoke free-drive directly from RDK
In RDK, set robot to plan execution mode.
Execute the plan named “PLAN-FreeDriveAuto”.
Press and keep holding down the enabling button on the motion bar to activate free-drive.
Invoke free-drive from UI tablet
To free-drive the robot in Manual mode (movement speed restricted, feels heavy):
On the motion bar, push the Auto/Manual slide switch to the lower position to put the robot into Manual mode, the UI tablet will show “Manual” as the current robot mode.
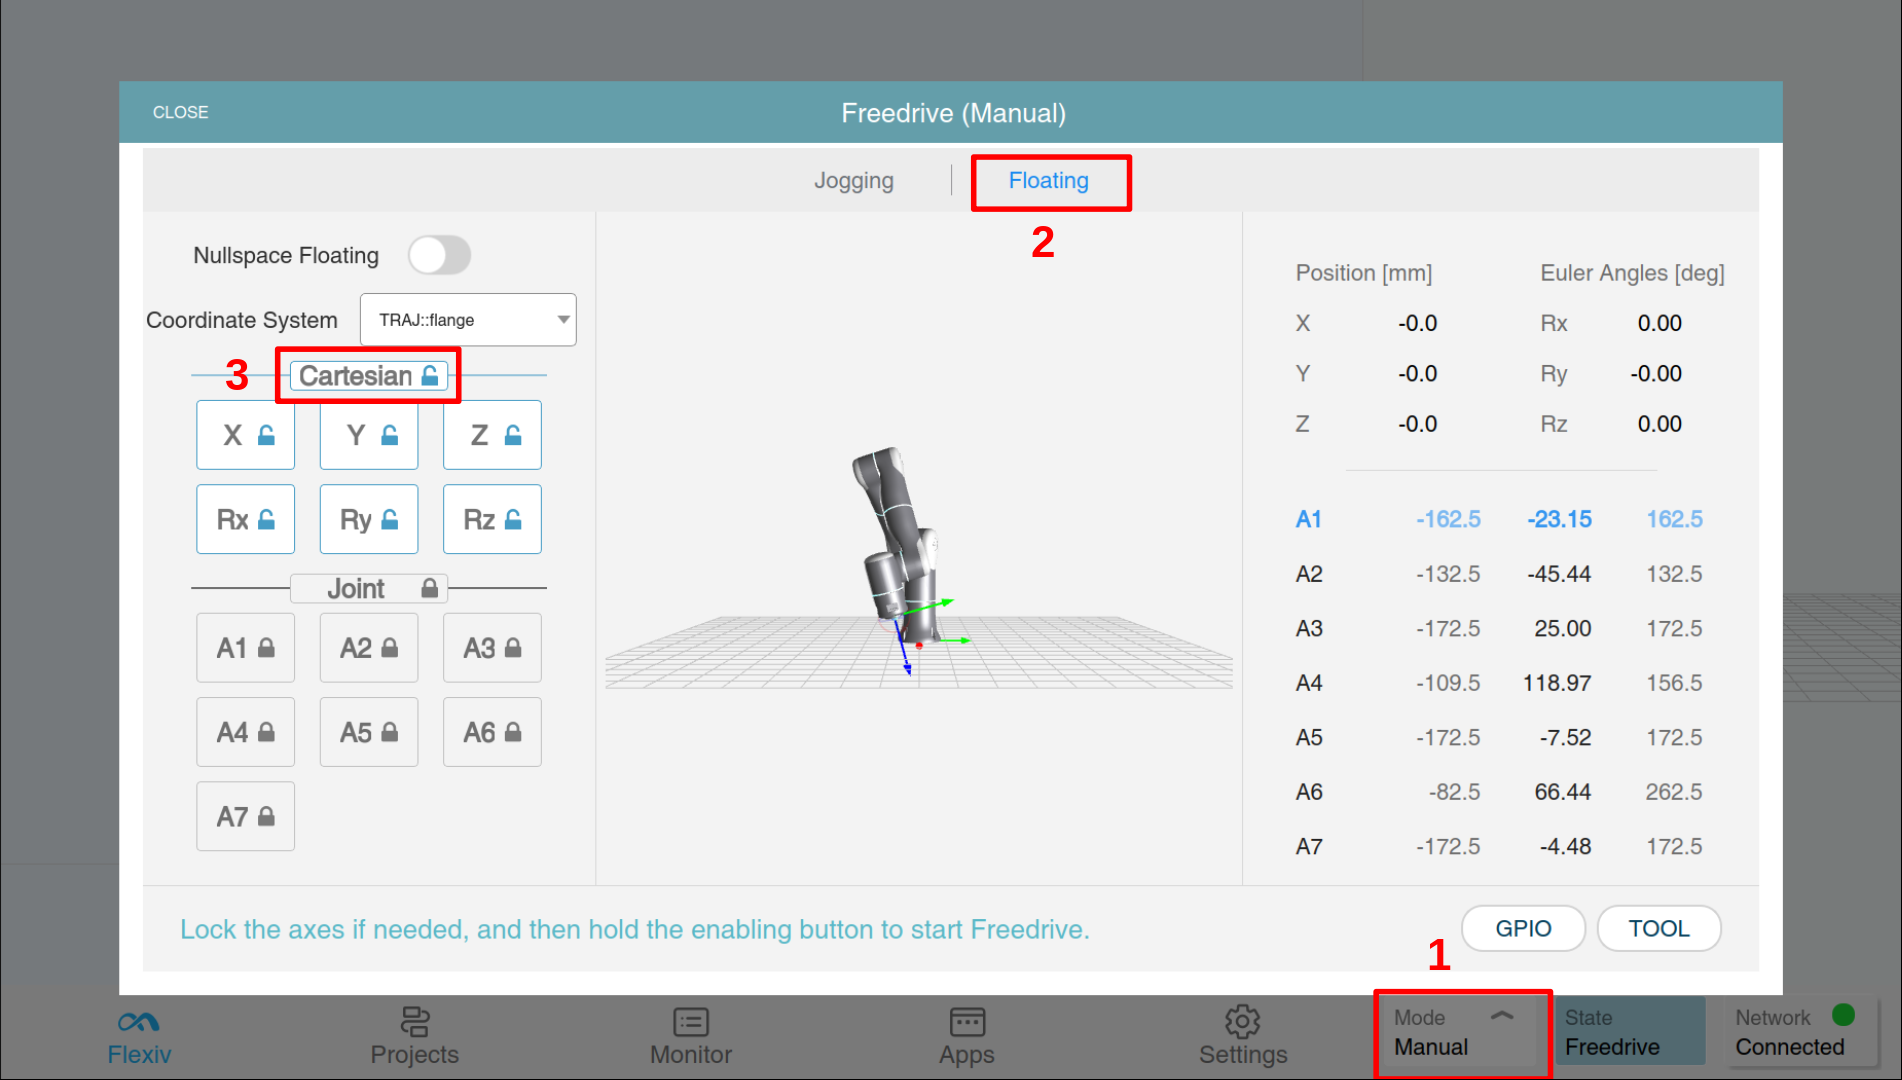
On the motion bar, click the Free-drive on/off button, the motion bar LED will turn to dark blue, and a Free-drive window will pop up.
In the pop-up window, click “Floating” tab, then unlock the Cartesian directions you wish to free-drive the robot along. Unlock all directions for unconstrained free-drive.
Press and keep holding down the enabling button on the motion bar to activate free-drive.
To free-drive the robot in Auto mode (movement speed not restricted, feels light):
Same as step 1 above to put the robot into Manual mode.
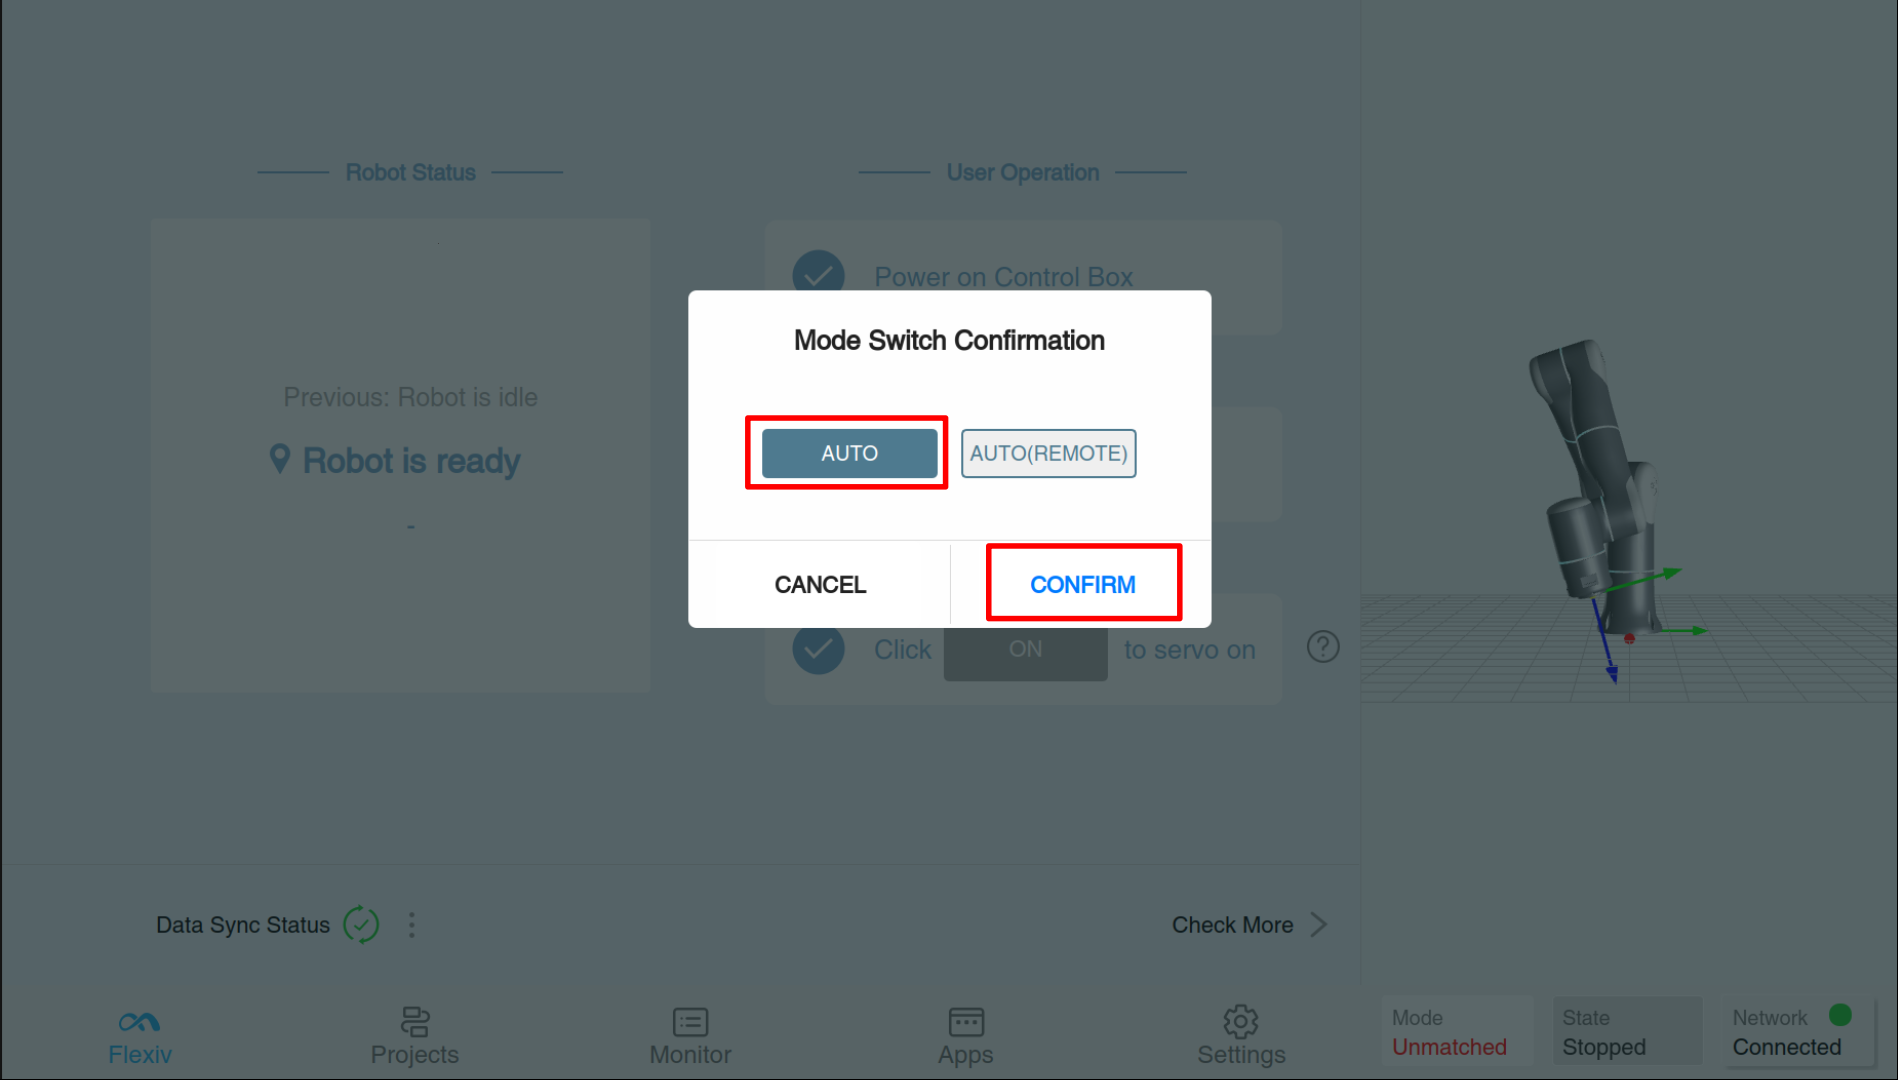
Push the slide switch back to upper position, a window will pop-up asking you to choose which type of Auto mode to enter, choose [AUTO] and confirm.
Same as step 2 and 4 as above.
Re-enter remote Auto mode
When the robot is booted with RDK server activated and slide switch at upper position (Auto mode), it will enter the so-called remote Auto mode, in which the robot is allowed to exchange data with external interfaces, including RDK client. This also means, in order for the RDK client to be able to connect to the robot, the latter must be in this remote Auto mode.
While the robot is in remote Auto mode, the UI tablet can only be used as an auxiliary tool and cannot issue commands such as executing projects or do free-drive. In order to issue commands from the UI tablet, the robot needs to exit the remote Auto mode and switch to Manual mode or the general Auto mode. The steps have been mentioned in the above section.
When done with issuing commands from the UI tablet, the robot needs to be switched back to the remote Auto mode so that RDK client can be re-connected. To do this:
Push the slide switch to lower position to enter Manual mode.
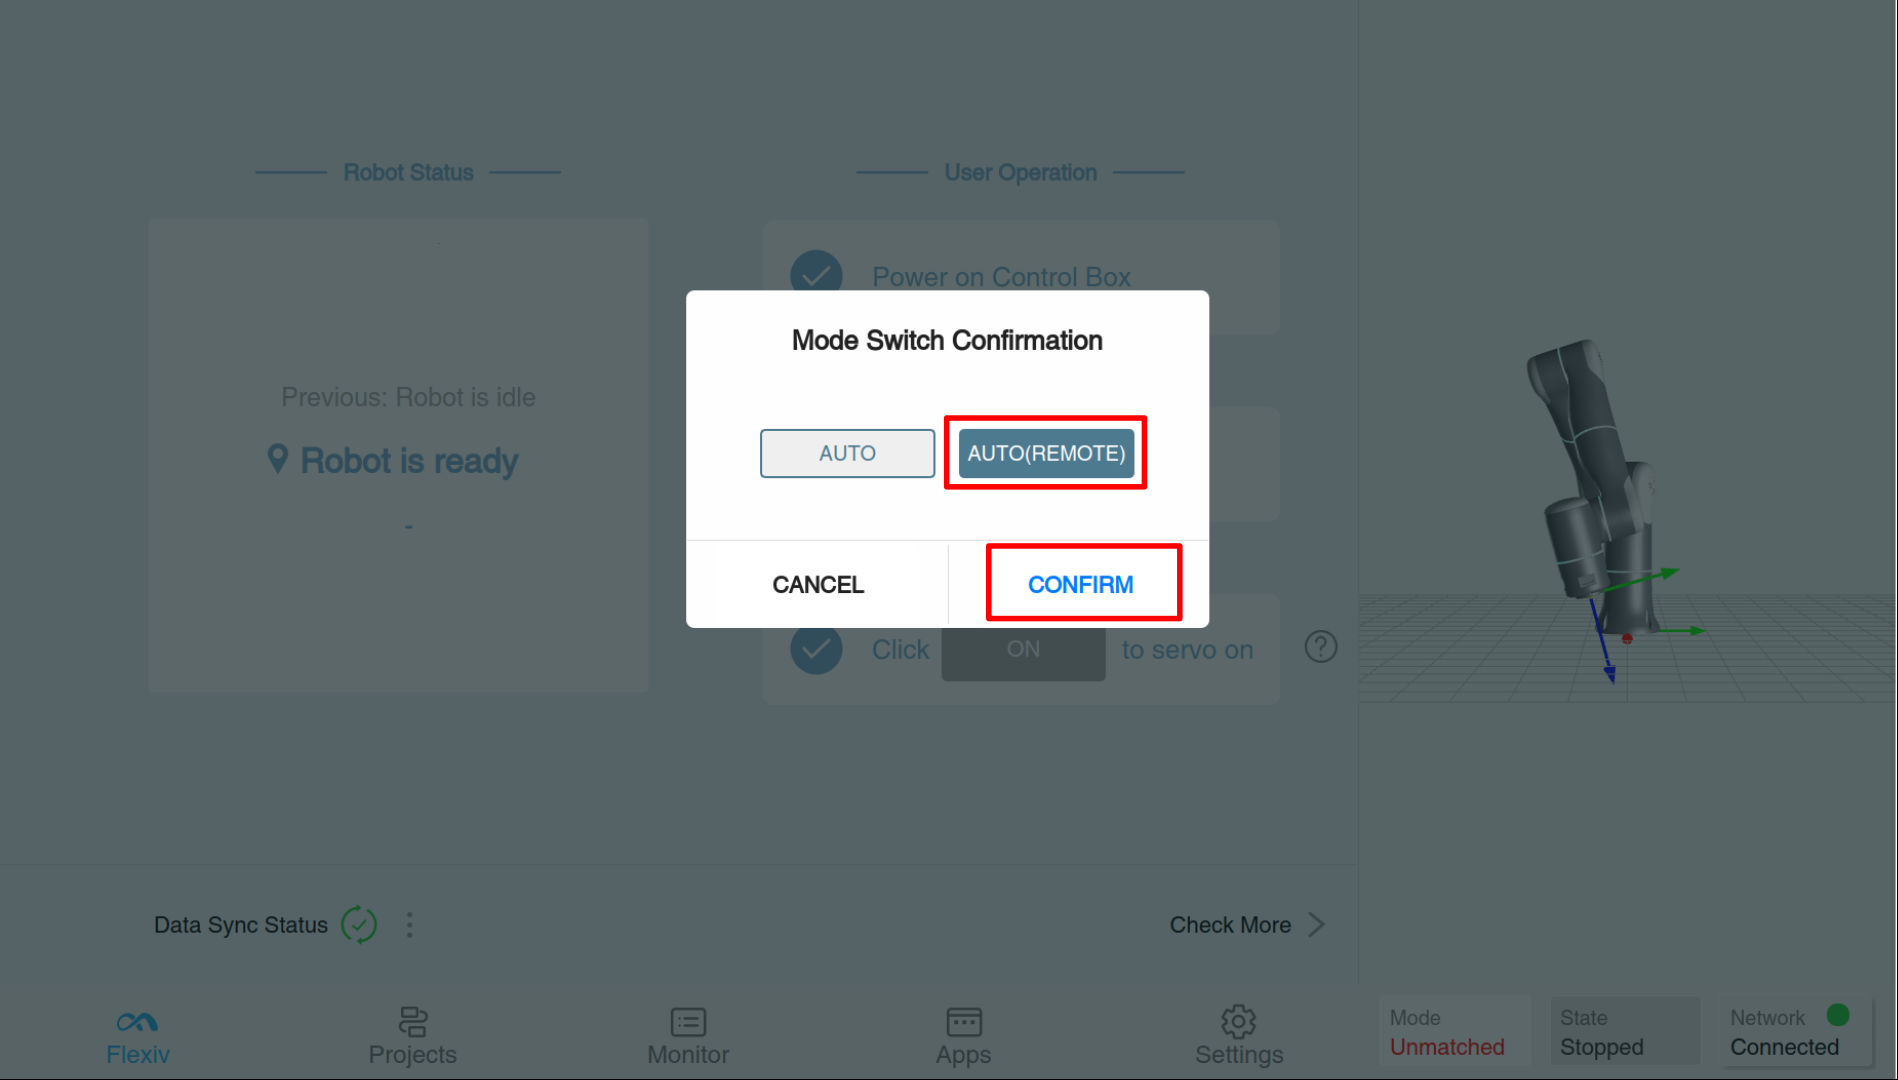
Push the slide switch back to upper position, a window will pop-up asking you to choose which type of Auto mode to enter, choose [AUTO (REMOTE)] and confirm.
Check the mode indicator near the right bottom of the UI tablet, it should now show “Auto (Remote)”.
Re-run the RDK client program from the workstation PC.